| |
| Allendale |
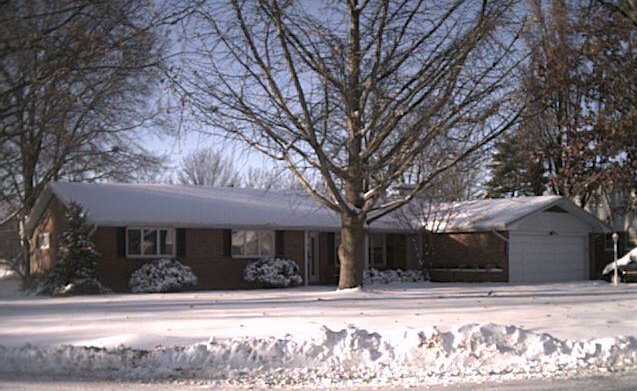 Before we were even married, my honey had found a new home she wanted us
to have. She was attracted by the inside layout and the large corner lot with large,
mature trees. (She promised to cut the grass and rake the leaves, and she has SO
FAR!) She also wanted me to have the large, open, semi-finished basement
for my woodshop. The shop hasn't yet been moved (six years later), but we have been
making progress on making the home "ours."
Before we were even married, my honey had found a new home she wanted us
to have. She was attracted by the inside layout and the large corner lot with large,
mature trees. (She promised to cut the grass and rake the leaves, and she has SO
FAR!) She also wanted me to have the large, open, semi-finished basement
for my woodshop. The shop hasn't yet been moved (six years later), but we have been
making progress on making the home "ours."
Here you can check out the newest home improvement projects. They are posted
in reverse order, so the ones at the top are the most recent. If you'd like to read them in
chronological order, please start at the bottom and scroll up, by clicking here. |
|
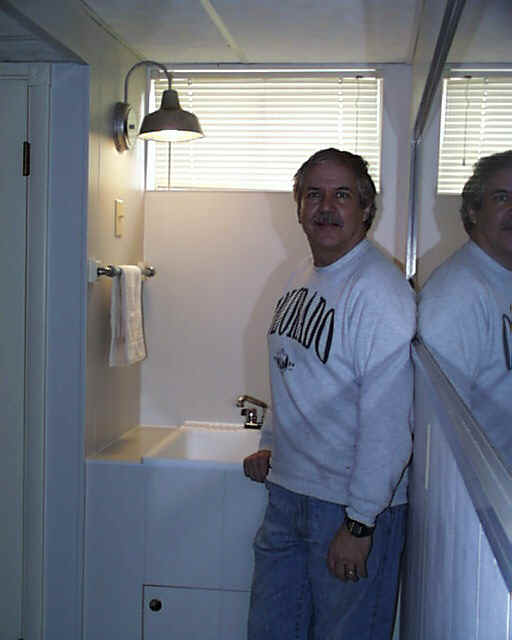
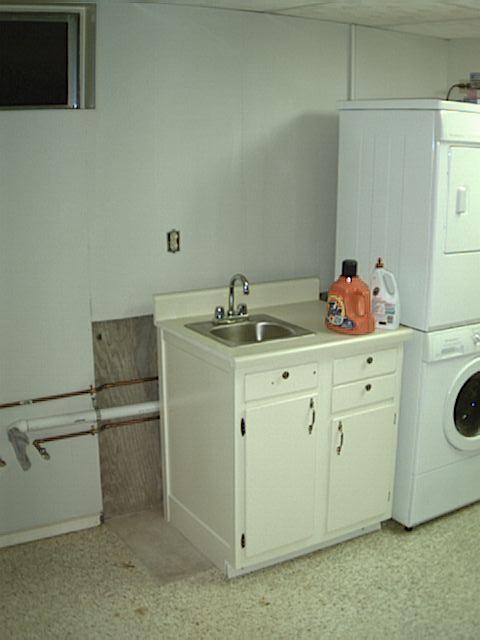
| After I finished the new wall, I constructed a built-in cabinet and work
sink. I had run the plumbing to this spot back when we installed the washer and
dryer. (see below) It turned out that the drain I had plumbed in was a little
high, so I didn't use the tub's actual legs, but built the cabinet to hold the sink
higher. That's actually better, as it puts it at a more convenient work height.
Brenda selected the lighting fixture, which is a galvanized exterior light that you
might find on a shed or barn. After making that choice, we decided to
"manufacture" the towel bar out of electrical conduit and fittings, along with
two spare decorative wooden blocks salvaged when Mike took out our shelving wall back in
September of 2002. (December 2004) |
 |
 |
This is the "finished" wall. The drop ceiling is not
visible in this picture, but it looks fine, trust me. I used my Craftsman laser
level (a Christmas gift from my brother-in-law) to line things up. Compare this
picture to the one of the newly-installed laundry sink and cabinet, below (January 2003).
Progress is definitely being made! I did not photograph the doorway to the
left of the window, because I have not yet found a suitable door at a price cheap enough
to satisfy me. (October 2004) |
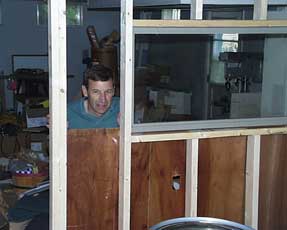
| Mike agreed to extend his Labor Day visit to Southeast Missouri by
spending a few days more with us in Cape. He didn't get a lot of leisure time,
though, as we spent many hours over several days shopping for supplies and building a new
wall between the shop portion of the basement and the "den/laundry room"
portion. (I got the nice 8' by 2' exterior double-glazed window for $39.) We
(he) wired a couple of GFCI-protected outlets into the wall while we were at it. My
job is to finish paneling the wall and find and install a door. (September 2004) |
 |
 |
The previous owner of the Watkins house had piled bark
mulch so deep that it covered the seam between the brick facing and the top of the
foundation. Termites, therefore, found it fairly easy to get in and begin chewing on
some of the framing lumber before I bought the house. Though the seller paid to have
them exterminated, I learned from her mistake, and now I advise people to keep that seam
clear. At the Allendale house, part of that seam along the front of the house was
covered with soil. In this project, the "termite moat," I dug down a
bit, installed a treated lumber support for the dirt, and put down weed fabric and pea
gravel. This also gives us more clearance for the hose, and makes it easier to
connect and disconnect it. (August 2004) |
| This photo shows that the yews have been cut down, their roots dug out and
hauled away, and the porch supports have been painted. I did the yew removal, Brenda
and I did quite a bit of the paint prep work, and Brenda's college-aged friend Lauren did
the bulk of the painting. She also used the "Johnson Beige" custom paint
on the west wall windows, and part of the dining room window. In addition, she used
another custom color to paint the blue-gray basement window frames so that they now match
the gray-brown concrete walls. [The vegetable gardens show a lot of growth since the
previous picture!] (July 2004) |
 |
 |
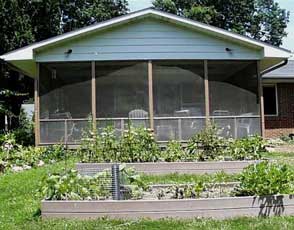
The new vegetable beds, patterned after the raised beds we saw in
Switzerland. Instead of being made of rocks, these are made of Timbertech planks,
which are made of sawdust and recycled plastic. According to "This Old
House" and Timbertech, this product is approved for ground contact, though it is
mainly used for decks. (April 2004) |
| In February 2004, we had our favorite treecutters take down and grind the
stumps of a small chestnut and a large sweetgum. This is the latter. It was a
bit big for me to do myself, though I could have easily done the chestnut. Also,
they have a chipper and a grinder, which I don't have, and they have ways to dispose of
the leftovers. This will help us establish a nicer lawn on that side of the house,
and also avoid having to rake up and dispose of the nasty gum balls. |
 |
 |
The walls of the home office were painted gold (richer color than it
appears here), and had a ghastly little border around the top. We were dismayed to
find that the border covered some of the original green paint. That means, after
removing the border, we'll have to paint the entire room. (We'll probably stick with
gold.) I discovered that a layer of Saran Wrap over the wallpaper remover keeps it
from drying out while the solvent does its thing. (January 2004) |
| This is a new bed, off of the west side of the back porch. This
entire area was covered in the dreaded ivy, which was sprawling out into the neighbors'
yard. The top row of rocks was already in place, but the ivy covered it. We
went to our Illinois source for rocks (where we also got those below) and bought some that
were a close match. I hope to relocate some of the herbs from Watkins to this bed. (July 2003) |
 |
 |
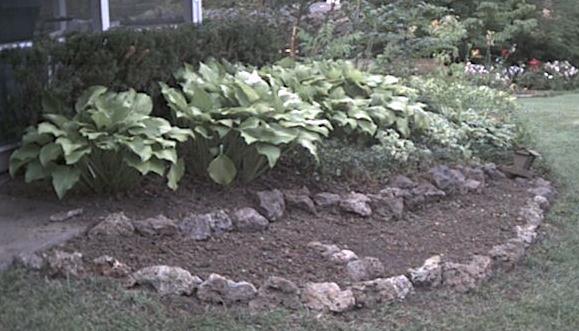
This is a close-up of the rocks we set at the front of the bed.
There are three of them, and while that may seem pretty obvious in this picture, in person
they look as if they could be one. We planted creeping thyme in the seams, which we
hope will spread down the face. In the back are a "Husker Red" penstemon
and a "Tequila Sunrise" coreopsis. (July 2003) |
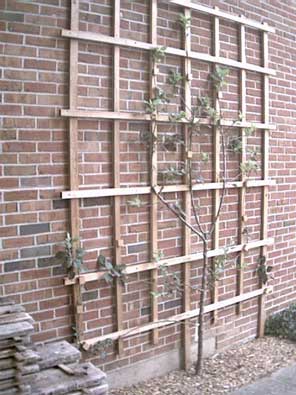 |
This is our Stark "Enterprise" apple, a variety that is reputed
to be resistant to most kinds of disease. (It isn't immune to aphids, though, as we
had a little infestation earlier this spring. A little spritz of pyrethrins took
care of that problem.) This tree was planted at the Watkins property two to three
years ago, with the intent of espaliering it. This spring, with my change of
residence, I thought it was time to change its residence, too. The trellis was made
from cedar deck lumber salvaged from the Darby estate in Chesterfield. Some of the
old, weathered wood can be seen at the lower left. It's quite a long and messy job
to machine off the decayed outer layer, but what emerges is worth the work. (June 2003) |
| This is the same bed a couple of months later. The ferns have
gotten larger, the astilbe at the center foreground has gotten comfortable in its new
location, there are now some red begonias near the sidewalk at the right, and across the
back are the planter boxes that Brenda assembled. (July 2003) |
 |
 |
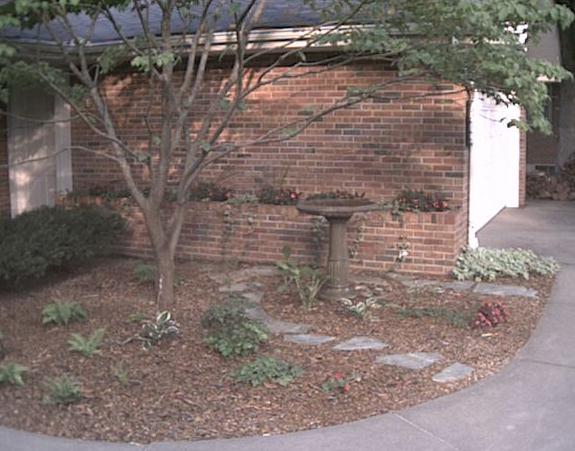
We went to the local auction barn to see about selling some of our stuff,
and while we were there, Brenda bought a large old birdbath. She was attracted by
its lines and aged patina, and she beat back another bidder to bring it home for eight
dollars! We temporarily set it up in the bed at the front door, which
consisted of a dogwood, three small yews, and ANOTHER tangle of ivy!
One weekend, we tore out the ivy, went to Illinois to buy some stepping stones,
placed the stones, planted some shade plants (hostas, ferns, and foamflower/tiarella), and
spread some wood chips. We think it looks MUCH better!! (May, 2003) |
| In the Spring of 2003, I used the Gravely tractor and blade to grade a
couple of gentle swales into the front yard. Water had been standing on the sidewalk
and driveway, and was unable to drain off. I thought we should be more polite to
potential guests than to make them wade to the front door. It took about three
stages of trial and error (and three rains) to know that I had finally gotten the grade
correct. I raked, seeded, fertilized, and strawed the swales on a Tuesday afternoon,
just before a Tuesday night downpour and windstorm. The photo to the right
doesn't really show much, but after all, the grade is supposed to be as gradual as
possible! (April 2003) |
 |
| I also used some of the rough lumber to make a perennial bed in the front
lawn next to the street. The soil came from the drainage swales that were scraped
into the yard earlier in the spring. This is definitely a work in progress! (July 2003) |
 |
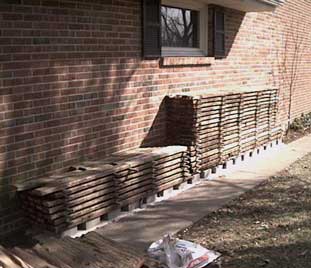 |
My sister and brother-in-law in St. Louis tore out an old deck in order to
replace it, and they asked if I wanted to salvage the lumber. I said "Of
course!" Brenda helped me tear out a tangle of ivy by the side of the garage,
and we laid down a base of sand and 8" x 16" blocks. Though my main
lumber-drying facility is located on the Watkins property, I wanted to set one up here in
anticipation of the woodshop eventually being located at Allendale. We think the
lumber is cedar, but not the aromatic kind. You can see the newly-transplanted
Enterprise apple at the rear of the stack. (March 2003) |
| After Mike left, I continued to work in the area. I ran the supply
and drain lines farther along the wall, to serve both a small cabinet and sink (shown) and
a yet-to-be-installed work tub. The little cabinet was a cut-down, salvaged version
of a much larger set of cabinets and double sink. Again, we wanted to save floor
space, but I still wanted us to have access to a sink for wetting and scrubbing trouble
spots on dirty laundry. It took me much longer than I would care to admit to
disassemble, cut down, and re-work the cabinet. As you can see, it doesn't fully
cover the gap in the finished floor that was covered by its predecessor. I may build
a wall to the left of the cabinet, and install the utility sink to its left, so that dirty
tools, hands, etc. can be washed on the "work" side of the partition. The
"finished" side would be my shop office, den, etc. (January 2003) |
 |
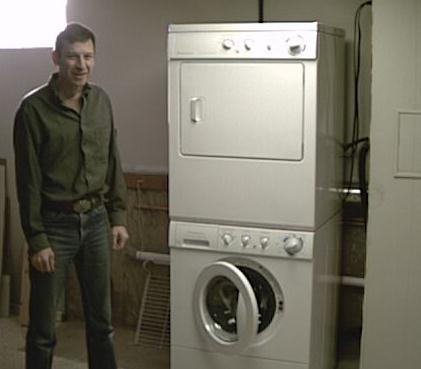 |
Other than painting and cleaning, I guess the first true indoor "home
improvement" project we took on was installing a new stacking washer and dryer.
We decided on this option in order to save floor space in the basement, to be used
for my hideaway. Well, we bought the appliances in late summer and early fall, but
they didn't get installed until Mike visited in December. He was a great help in
plumbing the water and drain lines. Here he is with the finished project. (December 2002) |
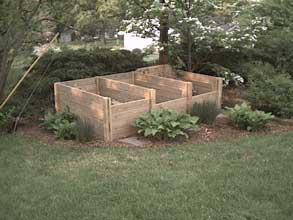
| The first outdoor project I took on was the construction of a large set of
compost bins, patterned after Mike's design in Denver. Though I built them in
November 2002, this picture from the Spring of 2003 shows them in a more finished state.
The hostas and daffodils were already growing in the lot corner, so all I had to do
was relocate them outside the footprint of the bins. During the spring, I put down
landscape fabric, stepping stones, and wood chips as mulch. (April 2003) |
 |
 |
|
| The story begins here, and you should scroll up to follow it chronologically. |